
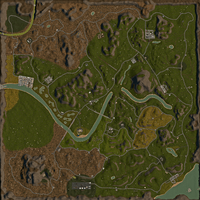
This the main location where you will be trying to survive, and uncover what really happened to cause the outbreak of the zombie virus.
The Unofficial Longdown Valley Field Guide was created by players who are not part of the development team of the SurrounDead game. Simply put, it was developed by those that have a passion for the game and wished to assist new and veteran players alike.
The Lore found within the Field Guide is non-canon, but will be updated to keep it in line with the Game Canon as much as possible. Where the Game and Field Guide disagree, the most current version of the Game should always prevail.
Use this Field Guide as a reference aid for your travels and exploration across Longdown Valley. Within it, you will find descriptions for various objects, events, and activities.
The Field Guide is written from the perspective of a survivor offering advice and guidance to fellow survivors, NOT A GAME DEV. While the Field Guide will not contain intentional falsehoods, it will contain speculation that may end up being "wrong" if the Game Dev Team goes in a different direction after the Field Guide is updated. Corrections/updates will be made as quickly as possible as new information is available to the narrator (IE the Authors of the Field Guide).
Field Guide Created by: Designer - Gremlin [Redacted] and Editor - Lux [Scott J.]
Current as of 10FEB2024 - Game update 1.4.5B Vitality
This the main location where you will be trying to survive, and uncover what really happened to cause the outbreak of the zombie virus.
The Safe Zones have additional features beyond completing your first Quest. They have the most Traders gathered together, and are where you can find special Traders during holiday events. They also let you change your appearance at the Barber and update your Survivor's License photo ID.
Although they don't allow you to initiate violence, they won't protect you from being chased by wild animals/etc. An angry bear is still an angry bear.
Keep checking the notice boards for Quests and Bounties that will eventually let you engage with the community on a deeper Level.
Safe Zones have 'No Build' areas around them to deter Survivors from using them as ambush/trap zones. You will have to venture away from the Safe Zone borders if you want to set up lures or activate Horde Beacons.
Although your initial location (and Respawn point) is mostly random, you will Likely end up closer to the Longdown Valley Safe Zone in the early stages of development. As the game gets closer to Launch, this may change...
All Safe Zones have several Traders you can sell off your salvaged goods and (hopefully) upgrade your equipment.
Weapons Trader - Not the only place to buy guns, but typically one of the better ones.
Junk Trader - An assortment of accessories and gear. In the Post Apocalypse, one Survivor's junk really can be another one's treasure.
Equipment Trader - Every Survivor needs more and better ways to carry their gear, and this Trader has what you need...most of the time.
Book Trader - Skill upgrades! If your have the cash, you can get a leg up on your Skills and even Levels by studying hard. Some books give straight up XP, while others give a multiplier until you level up that skill, so make sure you don't waste them.
Nestled among the few remaining sanctuaries, this haven provides a secure night's rest under a watchful gaze. Surprisingly spared from local bandits and COYOTE assaults, it draws friendly scavengers in search of essential items from the various traders. The Safe Zone provides an opportune location to unload surplus gear amassed during your travels. During your visit be sure to offer a pat to the loyal canine stationed on the porch before bidding your farewell.
Note: So far this Safe Zone has the most resources in one location, which is surprising given the amount of Zed activity nearby.
Spread across Longdown Valley are places people used to live before The Incident. Now mostly deserted, they can be a source of supplies or even a location to establish a base of sorts. Although it will take time to restore any infrastructure, there is something to be said about a solid roof over your head.
Ellwood, once a bustling hub in Longdown Valley, now stands overrun by the walking dead in the aftermath of the outbreak. Amidst the chaos, remnants of its former functionality endure-a hospital, scrapyard, gas station, supermarket, retail stores, and residential homes. Surprisingly, even in this altered era, Ellwood retains its multifaceted appeal. Yet, caution is paramount; any loud noises might draw in formidable challenges, a stark reminder of the persistent threats.
Nestled in a picturesque valley, Grain Valley was once a captivating sight. Unfortunately, not long after the outbreak in Ellwood, the infection took hold. The dense concentration of retail shops suggest that a traveling patron might have been the source. Regardless, the supermarket and diner still provide access to food items, and shops in the area may offer a chance to change clothes. Swing by the police station to the south for ammunition and weapons.
A quaint town nestled in the heart of Longdown Valley, Whitewood is a small but vital hub. Despite its modest residential population, the town boasts a sizable police station and hospital, offering a plentiful supply of weaponry and medical aids. Furthermore, the presence of a budding grocery store and gas station ensures that supplies are generally available. Make sure to drive through and stock up on essentials when passing through the neighborhood next time.
Lawrence Creek, once a pivotal station in Longdown Valley, harbors an abandoned underground train, once a lifeline, now silent amidst the undead. Nearby, friendly scavengers linger, hinting at concealed city resources. Navigate the town's streets for survival essentials, and explore various locations that may harbor potential upgrades. Amid the remnants of this once-vibrant station, Lawrence Creek beckons survivors to unravel its secrets and uncover valuable resources.
New Richland, one of the last cities to succumb to the infestation. the crisis unfolded as evacuees from major towns ought refuge in camps near the highway. Tragically, a single refugee's deceit about their history concealed an infection, setting in motion the city's devastating outbreak. In a disheartening echo of past events, the downfall of New Richland exemplifies the unsettling truth that it took just one infected individual to dismantle it all.
Around Longdown Valley you'll also find a variety of different locations to explore. From places to practice your skills to potential base sites and forgotten caches of resources.
Nestled in the norther expanse of Longdown Valley, the Longdown Raceway offers a thrilling experience, particularly ideal for cruising in a golf cart. Beneath the surface of excitement lies a grim history marked by tragedy. The raceway, once an adrenaline-fueled haven, claimed numerous lives. Marked with makeshift car ramps, it is a somber reminder of the risks intertwined with the pursuit of excitement in this unforgiving landscape.
Consider spending the night to indulge in the breathtaking sunrise views from one of Longdown Valley's iconic fire watch towers. These elevated vantage points offer unparalleled vistas of the southern valley region, making it a trip well worth the time and effort. Allow yourself to immerse in the beauty of the surrounding landscape as the morning sun paints the sky with hues of warmth, creating a memorable and awe-inspiring experience.
Established in 1890, the factory stands as an iconic landmark in the valley and a testament to what cam before. As the 21st century unfolded, it ceased heavy industrial operations, transitioning into the modern era of office work. It now serves as an excellent location for discovering a diverse array of useful equipment. Don't forget to explore below; additional treasures await in the depths.
The LDV Lake Resort, once a serene getaway and a refuge form the rigors of reality, has transformed into a somber reflection of the hellish landscape that envelops it. The days of idyllic relaxation by the beach, with toes buried in the sand and a beer in each hand, are nothing but distant memories. The resort, now bearing the scars of the unfolding apocalypse, serves as a stark reminder of the irreversible changes that have gripped Longdown valley.
The New Richland Lighthouse, standing sentinel over the coast, no longer emits its once-potent light, its brilliance dimmed by the absence of maintenance. The eerie stillness that pervades the area has given rise to the unsettling tales among travelers, who recount feeling inexplicable chills coursing down their spines when nearby. The lighthouse, now a haunting beacon of abandonment, stands as a testament to the unsettling atmosphere that has settles upon New Richland.
Regardless of what you were told at a camp store in the past, you only need the basics to survive. No fancy equipment, just shelter, food, and water. These are the most essential items that you must find and use, if you plan to live for an extended period of time. Starvation and dehydration will kill you if you ignore them!
Note: Keep and eye on your hunger and thirst meters!
Have no fret, a wide variety of food and water items can be found while looting. However, if you want to eat canned goods, you will need a can opener. Otherwise you can find items such as cereal, lettuce, and tomatoes to get you by. you can hunt animals for meat. Eating raw meat may satisfy your hunger, but it will come at a cost of your health. Airdrops with blue smoke contain rations and water. You can also cook meat and prepare meals with the use of a Cooking Fire. You can also fill empty water containers at a well or from open water, but check the quality.
Note: To build the Cooking Fire and/or the Water Well, you will need to construct a Building Bench.
Sometimes just wondering around...will turn you into a buffet. In addition to walking about as you explore the valley, you can also run and crouch. Sometimes running away from a threat is the best...or only...option. Just remember That there will always be things out there faster Than you. Crouching keeps you out of the line of sight of Zeds and humans, and they can't eat or shoot what they cant see. It also helps you improve your Stealth abilities for when it really matters. Understand and experiment with your movement options Crouching and Running can be combined - better stealth than running, buy not as fast. Crouching and Running both improve your relevant Skills, so there's little reason to just walk when you can do either of those. Some of the water is deep enough to swallow your whole vehicle, but on your own you can swim across and under it. Free diving is not only possible, but lets you explore underwater...as long as you watch your air reserves. More and more structures and locations are being discovered as survivors venture out of their comfortable zones looking for dwindling resources...and ways out of the valley.
Technically you do not need any specific piece of equipment to survive the night other than food and water, but let's be realistic here. Find yourself a weapon as soon as possible, preferably a firearm. Be careful though as noise will attract the undead and predators. See if you can find a few weapon modifications while on your next exploration, something that can make you silent as well as deadly.
In addition to the obvious covered before, you may find it beneficial to always travel with a sleeping bag. A sleeping bag will allow you to dynamically set a spawn point at a position of your choosing. To do this, you must place the sleeping bag on the ground and interact with it. This is incredibly useful as this new spawn point will be utilized should you perish.
If you wish to eat the various canned goods you find, you will need a can opener. Find one and keep it on your person at all times. Other essentials would be lock picks, so that you can crack open any left behind safes that you discover. Find yourself a set of wire cutters and bolt cutters too since you will need these to break open various weapon lockers and crates.
Lastly, Molotov cocktails are great if you're surrounded or if you can lure the undead into a confined space. Be on the lookout for alcohol, cloth, and tape so that you can craft them yourself. You can occasionally find ones some other unlucky survivor already made, but they can be few and far between.
As you level up, you will be awarded skill points. Skill points are used when unlocking Skills. You can access the Skill Tree by pressing "J" to bring up the journal. Then select the Skills tab. Expended points can be reset without penalty so feel free to try different combinations.
Lockpicking involves physically manipulating the lock with a lock pick. Finding the "open" position take time and skill, but don't rush it or you;ll find yourself with a pile of broken picks. Note: Manipulate the lock pick by sliding the mouse left/right. Turn the lock with the prying tool by using "A" and "D" keys on the keyboard. If you break all your lock picks, you can make more with your Crafting Skills
Longdown Valley is full of dangers. "Safety First" is a good mindset to have. You can craft "Rags" and "Bandages" from the Crafting Menu until you find better alternatives while scavenging around. To access the menu, bring up your inventory by pressing either the "TAB" or "I" keys. There will be a tab at the top left titles "CRAFTING". From there you can create Rags and Bandages to heal. Note: Once Experience Level 2 is reached, you can spend a skill point into Health Regen for a passive healing ability resulting in 1% HP every 2 seconds. Tip: Numerous medical supplies can be compacted into a "Medical Container" that only takes up a small space in your inventory. Aggressive players may want to Hotkey some medical supplies.
You should not only be concerned about raw damage, but also be aware that negative status effects, or debuffs, can occur when taking damage.
| Bleed | Heavy Bleed | Broken Bones | Radiation Sickness |
|---|---|---|---|
 |
 |
 |
 |
| Lose Health over time | Lose Health over time at a faster rate | Unable to sprint | Lose Health over time |
| 2-4% HP lost every 1-2 seconds | 4-6% HP lost every 1-1.5 seconds | Fixed with applying a Splint, Civilian Medkit or Medkit | 15% HP lost ever 5 seconds |
| Fixed with applying Bandages or First Aid Kits | Fixed with applying Bandages or First Aid Kits | Fixed with taking Radiation Pills, but constant exposure will require additional doses. |
Note: Radiation Filters in your Mask provide protection, but they are consumed over time - carry spares.
Abandoned vehicles dot the landscape, presenting varying degrees of disrepair. Keep a keen eye out for smoke plumes and engine fires, offering cues to potentially derivable vehicles. However, appearances can be deceiving. Fortunately, the Zombpocalypse has improved your mechanical prowess to allow you to repair almost anything with a trusty set of tools. Remember to secure fuel: gas stations typically contain "Vehicle Repair Kits" and "Gas Cans." Activate the repair kit with and "F" press near the engine for fixes, and most fuel caps are located on the driver's side, to the rear.
Repair Kits can also be Crafted if you find yourself in dire need.
Different vehicles will behave...differently, in some cases wildly. As you acquire new vehicle options, make sure you know their capabilities before something is chasing you or shooting at you. If you establish a secure location, consider having several vehicles on hand for different uses. If you don't, it's still worth considering having a spare or two.
Plowing through water is fun, but they aren't submarines and will eventually sputter out. Vehicles may also need repairs after spending too long running through water.
Tips:
In addition to the Safe Zones, various Traders can be found across the valley. Once you are outfitted with a GPS device, many of their locations will be visible on the Map. Some traders are able to stay off the radar and will only be found while roaming throughout Longdown Valley. Be sure to revisit any Traders when you are nearby, because the supplies they offer will change over time as they trade with others.
To establish a base of operations, your initial task involves locating crafting materials, with many conveniently found during scavenging across Longdown Valley. In a pinch, you can venture out to harvest basic materials like stone, metal, and wood directly from the sources. Whether through scavenging or harvesting, acquiring resources is essential.
Crafting materials can be acquired through looting, with certain places of interest offering higher yields. The list below serves as a helpful starting point. Keep in mind that build costs are substantial, and gathering a sufficient amount of materials may require a significant investment of time.
So you went out and found some building materials. Now, put them to use by pressing "TAB" and opening the Crafting Menu on the top left of the screen by clicking on the "Crafting Tab" on your inventory screen. To begin, You will first need to create a Crafting Bench.
Make sure you have room in your inventory spaces for the new object or else you will not be able to build it. Once it appears, right-click on the bench and select "Place". You can now position it to where you would like and you'll be able to operate the Crafting Bench by facing the bench and pressing "F". This will allow you to create more items for your base of operations. Check back to see if you can build new things as you improve your skills and gain new resources.
Note: There are three different benches you can build. Each opens the opportunity to craft a variety of items that are unique for each bench.
| Crafting Bench | Building Bench | Weapons Bench |
|---|---|---|
 |
 |
 |
| Resource cost: 10x Wood, 2x Scrap Metal, 4x Nails | Resource cost: 10x Wood, 10x Scrap Metal, 5x Nails | Resource cost: 10x Wood, 10x Scrap Metal, 10x Nails, 10x Bullet Casings |
| This is your basic starting bench that will allow you to create the other two benches listed. You can also create a few more essential items | This bench allows you to make storage items, various lights, furniture, and your defenses for your homestead | Create ammunition, molotov cocktails, landmines, pipe-bombs, turrets, and more |
Embarking on the journey of building a home brings numerous advantages. Consider the practicality - where else will you store the gear you've diligently salvaged? Much of what you need for your new operations center can be acquired through scavenging or crafting, provided you have the necessary materials on hand.
In the realm of real-estate, they emphasize, "Location, Location, Location." While choosing the starting point for your new home deserves careful thought, don't let it become an overwhelming concern. Chances are, you've acquired a vehicle by now, enabling you to explore the far reaches of the valley. A slightly longer travel distance may incur costs in terms of fuel and time, but considering the abundance of both, it's a negligible factor.
Building a base offers versatility in choice. Some opt for an empty bunker, as detailed in the following pages, while others prefer a campsite nestled on a hillside. Some even set up shop atop or withing existing structures. The potential locations for your base are virtually limitless. Be mindful of a tip you've likely been told. Refrain from storing items in open-world crates to prevent loss.
Regardless of your chosen location, the steps to build remain consistent. Begin by selecting a buildable object from your inventory, right-click on the item, and choose "Place." You'll then have the freedom to position it to your liking. With each placement, you're not just constructing a structure; you're transforming a mere house into a place you can actually call home.
Longdown Valley residents harbored concerns about an impending chaotic future, evident in the presence of reinforced bunkers. Were the bunkers foreshadowing what truly transpired at the nearby air base? These meticulously crafted bunkers serve as more than just shelters; they present a viable option for establishing a base of operations. For those bold enough to navigate the uncertain landscape, these well-constructed bunkers provide a secure starting point, offering both refuge and a strategic foothold in the face of the unknown.
Situated Southwest of Ellwood is a nice quiet bunker that has been built into the landscape. Unlike many other bunkers, this one is not next to a home. Private land all to yourself. What's not to like?
Note: Close to resources, but that means close to Zeds, so beware when venturing out...
Located in the north, this bunker offers some nice features. For starters it has a garage and a homemade fuel pump that has a chance of spawning fuel. That will surely help you get from point A to point B. Secondly, it is conveniently located near a trader and a gun store.
Note: Good access to some resources...but kind of far form other survivors.
The Lawrence Creek bunker is nicely located near the middle of the map, offering you a nice home to conduct hub and spoke operations out from. Being not too far from the city, offers nice scavenging runs.
Note: Good access to resources and survivors...but where can you run to if it all goes sideways...?
Located in Eastern Longdown Valley with quick access to a local trader makes this a nice location to bed down for the night, perhaps even longer. Enjoy the offerings of the surrounding tolling landscape for its breathtaking views, and check out the barn just to the South for some extra features.
Note: A good distance away form threats, but close enough for resupply excursions.
Nicely secluded away and nicely located between two high tiered zones. a perfect spot for some fast cash and lucrative hauls. There is a nearby gun store that will help you keep locked and loaded for whatever comes next. In time, maybe you'll be able to do some repairs on the place.
The outbreak’s origins, veiled in uncertainty, fuel speculation. Some theorize a mutation from a flu virus, while whispers hint at a clandestine military endeavor gone awry. Regardless of its genesis, the world as we know it now grapples with the consequences of a deadly contagion. The contagion spread like wildfire, transforming the valley into a relentless undead haven. Some undead exhibit unique traits, possibly influenced by environmental factors. Despite their distinctions, all are drawn to noise and movement. Be cautious and stay hidden, as even a sighting can provoke a response.
 |
| Missing lower limbs. |
| Easily outpaced as their movement is rather slow. |
| Hard to attack via melee. Attack Crawlers from a crouched position and aim down for best chance of hitting. |
 |
| Greater health than the Undead Crawlers. |
 |
| Weakest and most prevalent of zombie types. A prominent physical train are the yellow glowing eyes. |
| Found widely across the valley. |
| Manageable in small numbers, but can prove deadly when overwhelmed by many. |
 |
| Wields a weapon. |
| Does not appear to cause more damage than normal Shamblers. |
| Not to be afraid of unless there are many. |
 |
| Can be mistaken for Shamblers, watch for more advanced decay. |
| Found widely across the valley. |
| Usually found with groups of Shamblers. |
| Fastest undead so far. Will pursue for some distance. |
 |
| Faster than a Shambler, slower than a Sprinter, and distinguished by its glowing green eyes. |
| Found in areas where radiation is present and for reasons unknown also along the road at police roadblocks. |
| Additionally inflicts radiation poisoning when attacking. |
 |
| Similar to Radiated Undead. |
| Emits a noxious cloud of radiation. |
| Gaseous cloud inflicts radiation damage; do not let them get within close proximity of you. |
 |
| Readily identifiable by its glowing red eyes. |
| Found in areas where "Infestation" events are occurring and typically found where key-card access is required. |
| Avoid, if possible. Take them down from a distance. |
 |
| Distinguished by mysterious red dripping substance and red mist. |
| Erupts in red mist upon death inflicting heavy damage and acts as a magnet to other undead. (Is it noise or pheromone related?) |
| Can use its death as a lure or distraction for other undead. |
 |
| Comes after an Infestation has been cleared. |
| Red eyes like that of the Infected Undead kind. |
 |
| Can easily outrun humans. |
| Best taken down at a distance rather than up close. |
| Not usually alone, quite often found in packs. |
 |
| Military working dog. |
| Wear armor and has more health than its counterpart. |
| Best taken down from a distance. |
 |
| A formidable opponent. |
| Can easily identified by stature and glowing white eyes. |
| Inflicts significant damage. |
 |
| Physically larger than counterpart, doubling its size. |
| Extremely harder to kill due to significantly more health. |
In a futile endeavor to contain the outbreak, authorities established HAZMAT/Decontamination Stations, a now obsolete measure still scattered sporadically across the landscape. These remnants of desperate efforts to control the contagion now stand as eerie relics of a bygone era. Venture cautiously, for a variety of undead types now patrol these once-functional sites, transforming them into potential danger zones. Keep a watchful eye, as navigating these areas requires heightened vigilance and strategic awareness to evade the lurking threats that now call them home.

Notes: Someone is cleaning up these sites. Are they from outside the Valley? Why do they come back? Why aren't they trying to contact us...what are they and whoever they talk with not sharing?
Example of Undead Convoy

Example of Undead Crashed Helicopter Site

Throughout Longdown Valley “Infestations” may start to occur. They are reported on the map once a GPS device has been equipped.
Infestations attract numerous Infected Zombies to the pile of corpses. In order to rid the area of the infestation, you will need to destroy the zombie corpse pile by inflicting damage directly to the pile. Infestations will reoccur...

As the zombie outbreak unfolded, civilized society rapidly crumbled. While you might encounter a few friendly scavengers, a significant number of individuals are not to be trusted. Rather than offering a helping hand, they are inclined to take your life. Bandits are prevalent, forming groups along roadways, establishing small camps, or fortifying strongholds. Trust becomes a rare commodity in this new world order, where survival often hinges on one’s ability to discern friend from foe. Be cautious of encampments with black smoke plumes.
Note: They're getting smarter and faster at locating our firing positions, especially at ground level...
 |
| Effectively utilizes a melee weapon. |
| Found along roadways and within bandit encampments. |
| Will rush to get within arms reach to attack and will chase you for long distances. |
 |
| Equipped with a firearm. |
| Found along roadways and within bandit encampments. |
| Aggressive and will attack from a distance. |
 |
| Equipped with a firearm. |
| Found randomly along roadways and within bandit camps. |
| Aggressive and will attack from a distance. |
 |
| Toughest of the Bandits. |
| Never found alone, surrounds self in the protection of others. |
| Equipped with stripped COYOTE gear. |
| Higher chance of holding onto key-cards and occasionally laptops stolen for COYOTE Officers. |
Example Bandit Roadway Ambush

Example Bandit Campsite

Example of Bandit Fortification

Example of Bandit Stronghold

The paramilitary force known as COYOTE swiftly took control of the valley after the military left. They are not from here and have no allies. Equipped with mil-spec gear and poised for any confrontation, caution is paramount in their presence. Their arsenal and tactical readiness make them formidable foes. As implied by their name, a solitary COYOTE member is never isolated but rather part of a cohesive pack. Approach with extreme caution. Underestimating COYOTE could lead to dire consequences in the unforgiving terrain of the valley.
 |
| Utilizes military-grade equipment. |
| Found overlooking important COYOTE locations. |
| Extremely accurate. |
 |
| Alpha of the pack. |
| Distinguishable with the use of mil-spec night vision device. |
| Higher chance of holding onto Secret Intelligence Laptops and key-cards. |
Example COYOTE Checkpiont

Example COYOTE Crash site/convoy

Besides the random Locations Coyotes can appear, they are typically found guarding the remaining high-value Locations across the valley. No one knows if they are securing them for eventual re-occupation, if they're protecting valuable assets, or if they've simply been abandoned with the rest of us and retreated to defensive strong-points. The limited interactions we've had that don’t involve gunfire are strictly one-way, unless they're selling off what we guess is surplus equipment.
If the Coyotes are there, it's for a reason...even if we don't know what it is yet.
Amid the unfolding zombie infestation in Longdown Valley, be alert for additional peculiarities, as various instances of paranormal activity have been observed. These anomalies share a physical likeness with the typical zombies found in the area. However, a stark deviation is apparent. Undeterred, my exploration of the valley persists, seeking to unravel the physical mysteries that intertwine the supernatural with the ever-growing threat of the undead.
Notes: Are they another threat, or are they trying to tell us something? What could this mean? There is something different about their faces...
Scattered across Longdown Valley are concealed caches, carefully curated by a handful of local residents who embrace the "Prepper" lifestyle. These invaluable items are tucked away within inconspicuous blue barrels, strategically placed in often-overlooked locations. The contents of these caches range from weapons, clothing, and food to medical aid and even military equipment. Vigilance is key; keep a watchful eye for these caches hiding in plain sight. Once you find them, be sure to check back regularly in case the owners or other survivors have moved or restocked them.
In this accursed land, airdrops stand as a beacon of hope. Keep a keen ear for the rumble of military cargo planes soaring overhead, signaling an imminent airdrop. Exercise caution, as the drop may be pilfered or vanish if you delay your arrival. It appears our benefactors aim to maintain a tight grip on the supplies accessible to us, adding an element of urgency to the pursuit of these crucial resources.
Colored smoke markers will be visible one the cargo is released by the aircraft and guide you to their landing zone. The smoke will mark the airdrop's location for a short time after it lands, and if you have a GPS, markers will show up for a limited time.
| Green Smoke | Red Smoke | Blue Smoke |
|---|---|---|
 |
 |
 |
| These airdrops contain military supplies and usually backpacks to carry them in. | These airdrops contain medical supplies. | These airdrops contain military rations and water supplies. |
As has been true for the history of airdropped supplies. Occasionally the pallets will land someplace inaccessible, or nearly so. Some will land on top of buildings or up mountains, while other will get tangled up in trees.
You can access some with creative thinking, like climbing on a vehicle to get on a roof, or driving uphill of the pallet and bumping it down. Proper positioning of a vehicle can also use it to hold you in place while you loot the pallet.
Several areas within the valley are likely to contain more sophisticated weapons and gear. You know what they say... "With great risk, comes great reward." If you go sticking your neck into these places, you would be wise to ensure you have the medical supplies to treat any and all types of injuries and ailments. For many locations, access is only granted to those with a key-card. Lastly, bring along a respirator; the higher the quality, the better and stock up on Filters and Rad Pills.
Despite the official narrative, the outbreak's origins remain shrouded in uncertainty. The rapid response of the military and medical teams to an incident in a residential home suggests a depth beyond what was in the news. This incident marked a larger crisis that the government struggled to deal with. The implications of their reaction leave lingering questions about the undisclosed and potentially more ominous aspects of the unfolding situation.
Note: Be watchful of the feral hounds, radiated undead, and possible infected undead.
Forward Operating Base (FOB) Alpha was once a military staging point for all activities taking place Eastward at the "Patient Zero" household and the bomb that was "accidentally" dropped by the Air Force. Now the FOB is heavily patrolled by the undead, both human and canine. It's a perilous place to venture to with a heavy layer of radiation. Be sure to bring a respirator, filters and rad pills. Move cautiously to detect lurking dangers before they spot and ambush you.
A military checkpoint along the road to FOB Bravo. Where there is military, there is food, water, and equipment. Whether abandoned before an infected takeover or stripped by bandits, it's worth investigating.
If one should find themselves in the general area, why not check it out...? What do you have to lose and what's the worst that could happen...?
Recognizing the inadequacy of their containment strategy, the military intensified operations at FOB Bravo. While their exact intentions remain unclear, locals observed nocturnal activities and military missions extending beyond the announced humanitarian aid relief operations. Uncertain about the implications, there might be valuable insights waiting to be uncovered at FOB Bravo, shedding light on the events unfolding throughout Longdown Valley.
Note: Bring a flashlight and rad pills!
This served as a shelter-in-place for the wealthy elites. To deter outsiders, the entrance was secured with a key-card access. The restricted entry might explain why this bunker escaped raids by other survivors. Numerous valuable items probably remain since the initial evacuees moved South or fell victim to the undead. Enter cautiously; only do so if you're prepared for a confrontation. Rumors continue to circulate about sightings of glowing white eyes.
Underground and with no access to sunlight, be sure to bring along some sort of light source or night vision device. Otherwise you may just get lost in the dark and be an easier victim to the infected ones. From deep within the tunnels comes guttural sounds. Clearing out the Lawrence Creek train tunnels is not for the faint hearted and will be a strenuous task. be cautions of areas where the undead could trap you as your escape routes are limited. One way in, one way out.
Notes: Bring a flashlight or night vision device, better yet bring both and extra batteries! New stations are being discovered all the time as excavations proceed. Survivors... or something else...?
The Lawrence Creek Prison, once an unfortunate necessity, underwent a transformation and is now inhabited by numerous infected. Renowned for its fortified structure, the prison became a haven for the locals and military, serving as a fortress to which they retreated when the virus initially swept through the region. The formidable architecture of the prison, originally designed to confine wrongdoers, now ironically shelters those grappling with the aftermath of the viral outbreak.
Note: The side entrance may or may not be a safer option.
While no longer an active airfield, the base still provides military-grade equipment to those daring enough to breach its defenses and confront the horde of zombies awaiting visitors. Exercise caution during your approach, as there are reports of mines placed around the airfield to discourage unauthorized entry. The contents left behind in an aircraft hanger are unknown, as its main doors remain closed, concealing the interior from view.
Note: Use the key-card on the main hanger's aircraft door, not the personnel door.
COYOTE military members guard the entrance to the bunker. What could be inside that merits such protection? From the outside, this bunker appears less significant than others in the valley. Concealing something valuable sometimes involves making it seem inconspicuous. Maybe that strategy worked pre-infection, but now, with COYOTE everywhere, the secret's out.
Notes: Great place to find larger backpacks! In order to enter you will need to bypass the security system. Maybe disabling the power to the door will work?
Deep withing the mountainside, the military erected a secure facility. Only a select few were aware of the secrets conducted within those walls. Despite the military's efforts to deter others from the facility's entrance using roadblocks and mines, the undead managed to reach the blast door. State-of-the-art remotely operated defenses still activate, repelling any attempts by scavengers to gain access. Be mindful of the threats; more importantly, be cautious.
Note: Heavily defended by all walks of life...
The old observatory, once the crown jewel of the valley, is now home to the paramilitary group called COYOTE. Heavily defended and well-fortified. it's likely they're safeguarding something valuable inside. It could be worthwhile to invest your time, energy, and effort in exploring the area. Ensure thorough reconnaissance before a direct assault; sniper teams defending the observatory have successfully thwarted several assaults from local scavengers and bandits.
Note: Snipers everywhere. Aggressive defenses.
Off the Southeastern coast of Longdown Valley is an abandoned Drilling Platform, as well as several wrecked and sunken ships. Rumors abound that they were doing more than just drilling for oil or natural gas under the waters off Longdown Valley.
Any who have gotten close have reported significant undead activity, and high levels of radiation. None that we know of have ventured out and returned...alive.
When clearing out areas with higher Level enemies, you may come across special items such as the Secret Intelligence Laptop and Horde Beacon.
When researching the files on the Secret Laptop you may find information detailing the locations of high tier equipment caches and enemy locations which may also contain higher tiered equipment. Look for the Quests in your Journal.
Once the Secret Intelligence Laptop is scanned, a map marker will be generated. Go to the site and complete the task at hand. Be sure to loot all containers.
Notes: Seek out Classified Military Crates. Chance of one or more legendary items contained within. Compound crates will be found at COYOTE and Bandit camps instead of classified military crates
The Horde Beacon will attract waves of the undead when activated. Eventually a Boss Zombie will show up to the encounter. There is an increased likelihood of finding higher tiered equipment on the corpses of Boss Zombies.
These beacons may prove a resourceful, if dangerous, way of finding equipment upgrades.
The are a collection of notes made as a reminder to myself and others during exploration.


